Showing posts with label DATA RECOVERY SERVICES Kernel Data Recovery – Wide range of data recovery softwares. Show all posts

Outlook Inbox Not Showing All Emails – How to Fix the Issue?

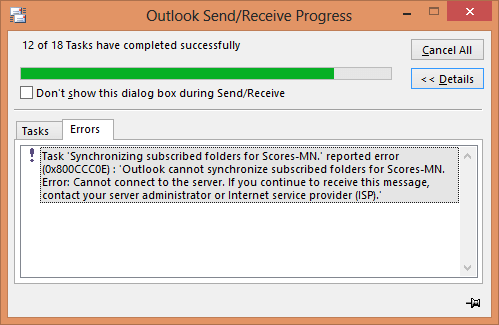
There are times when Outlook users complain about how they are unable to see their Inbox emails. This can be due to any technical glitch, or there might be something wrong with your settings. There are scenarios where people confuse unsynced email with missing emails. So, to give a better picture, here is an explanation to it: unsynced emails are those which are not yet updated with your account either because of bad internet or because of any server instability, but sooner or later they will get synched as the connectivity is established. But missing emails are when you are not receiving a certain type of emails or any email even with a good internet connection. To solve the issue of the unsynced email, you can check your internet connectivity or click on the Send/Receive tab on the top of the Outlook screen and click on Send/Receive All Folders , and all your emails will be synched.

Now, let’s discuss how you can get back all those missing emails; there are many ways to get them back, and we will discuss them one by one.

Solution 1– If you are also facing the missing emails from your Inbox, then you should try changing the custom filter settings. Because one of the most common causes of not receiving specific emails is that you might have applied a custom filter at some point in time. So, now you need to change the settings, follow below-mentioned steps.

  1. On the View tab, click on the View Settings.
  2. Now, select the Filter option from the menu of Advances View Settings.
  3. Now, click on the Advanced tab in the Filter dialogue box. Here select the Received today option from the list and click on Remove.

    Note: You will see Received Today option in the list only if this filter is already applied, if you can’t see it then most probably this is not the reason why your emails are missing.

  4. Finally, click on the Ok button.

Solution 2– Sometimes why your emails are missing may not have any reason; you can just remove the email account from Outlook and add it again. As simple as that. To remove your account, you need to follow few simple steps:

To Remove

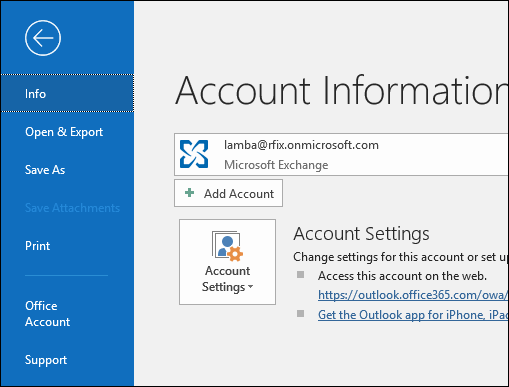
  1. Click on File button on the top left corner of Outlook 2016 screen.
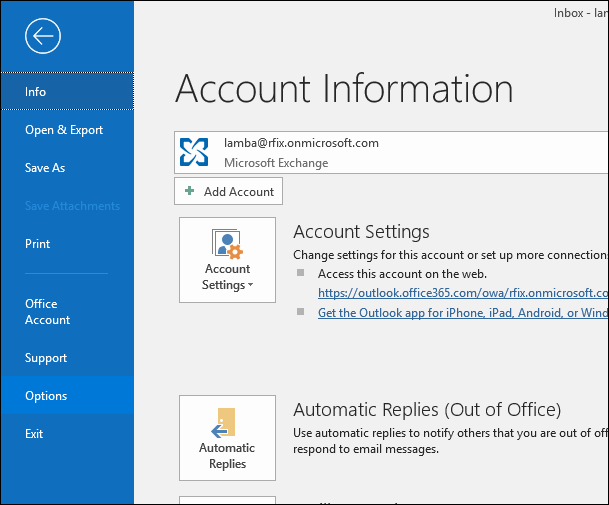
  2. Now, in the Info category click on the Account Settings drop down and select Account settings.
  3. Now select the account that you want to remove and click on the Remove button.
  4. Confirm that you want to remove the account by clicking on Yes.

To Add Again

  1. Click on the Start button on Windows and select Control Panel from the menu.
  2. Now, double-click Mail from the Control Panel list.
  3. Select Email Accounts from the mail set-up dialogue box.
  4. In Account Settings dialogue box, click New.
  5. In the Add Account dialogue box, select the desired option, let’s say Email Account and click on Next.
  6. At this stage enter the email account details of your account or select manual setup option. Click on Next to proceed.
  7. It may take a few minutes to add your account, wait until then and you are done.

Solution 3– Another reason for missing emails is you have recently switched, and your old mail history is not exported and imported yet. So, now you need to export and import all your old email history; to do so follow the below-mentioned steps:

To Export

  1. Open Outlook and start with clicking on the File tab on the top left corner of the Outlook 2016 screen.
  2. In the category Open & Export, click on the Import/Export.
  3. Now, in the Import and Export Wizard dialogue box select Export a file and click on Next.
  4. Select Outlook Data File (.pst) and click on Next.
  5. Now in Export Outlook Data File dialogue box select the email account appearing on the top of the list. Make sure that Include subfolders checkbox is marked. Click Next.
  6. Now, click on the Browse button to add the destination to the folder.
  7. Select the options to export the duplicate items and click on Finish to complete.
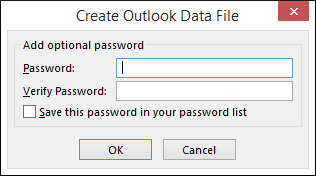
  8. Provide a password to your Outlook file and click on Ok.

Once you are done with exporting the PST, you need to create a new Outlook profile and import the data to the new profile. The whole procedure is mentioned in detail.

To Import

  1. Start with clicking on the File tab on the left corner of the screen.
  2. In the Open & Export category select Import/Export.
  3. Then select the option Import from another program or file in the Export Wizard. Click on Next.
  4. Select Outlook data file (.pst) from the file type option and click on Next.
  5. Now, use the Browse button and select the PST from your system. Click on Next.
  6. Select the import options, and mark the checkbox Include subfolders. Click on Finish.
  7. Now, wait for a while until the whole process takes place, and your folder will be up to date.

If, besides missing emails, you are also facing the problems related with PST, then you should keep reading this blog to know the best possible solution for PST related issues.

Kernel for Outlook PST Repair

Be it a corrupt, damaged, or broken PST file, this tool can restore, and recover them in no time. It is designed to solve any issue and can fix even recover deleted messages and attachments. Outlook PST recovery tool provides you option to save your recovered emails in many different formats. The amazing filter and search options allow you to recover the items from a PST file as per your requirement; and this tool is compatible with all versions of MS Outlook and Windows.

Download

The post Outlook Inbox Not Showing All Emails – How to Fix the Issue? appeared first on Kernel Data Recovery - Wide range of data recovery softwares.


from Kernel Data Recovery – Wide range of data recovery softwares http://bit.ly/2vkTLNa

Fix Error Mailbox Export Request Stuck Queued

“I’m having a problem in exporting mailboxes to PST, all the requests are getting into the queue and remains there with Queued Status. I even tried to restart the MRS, the CAS Servers, and MBX Servers, but none of them helped me resolve the issue.”

Many queries like this are submitted on Exchange forums, Microsoft community, and other Exchange platform.

Exchange Server is one of the most widely used email servers provided by Microsoft. With the help of Exchange server, users can manage their emails, contacts, calendars, etc. Almost every organization relies on Exchange for storing their data or day-to-day activities. However, users need to backup their Exchange Data to avoid any data loss or disaster recovery. Also, when users want to use their Exchange data with MS Outlook, they need to convert it to PST format.

As an administrator, you might know how to migrate Exchange mailboxes with PowerShell commands. But, while exporting Exchange data to PST or migrating Exchange mailboxes, many users often face an error “New-MailboxExportRequest Stuck in Queued Status.”

In this blog, we will discuss how you can get rid of this issue with the most effective methodology.

Methods to Get Rid of MailboxExportRequest Stuck in Queued

There are various solutions to fix this error, but it’s not necessary that every solution will work in your case. So, you’ll have to try every solution to get rid of this issue.

  1. Update the Exchange Version

    Sometime, this problem might occur due to an old version of Exchange Server. So, you’ll have to keep your Exchange Server updated to improve its performance and eliminate such issues automatically. Also, you get better security, management, and flexibility with the newer versions of Exchange. Updating Exchange Server might resolve “mailbox request stuck in queued” issue. However, if it doesn’t, then you can refer to below methods.

  2. Check Whether the Exchange Server is in DAG Environment

    The mailbox export request is used to check the progress of Exchange mailboxes server in the DAG environment. So, you’ll have to check if the Exchange Server is in DAG environment or not. If it is present in DAG, then you’ll have to verify the DAG replication is in a stable state and there are no issues related to DAG. Using this technique can also resolve the New-MailboxExportRequest Queued issue in Exchange 2010, 2013, 2016.

  3. Prune Replication Process

    One of the effective and successful methods to get rid of this error is to suspend the replication task first.

    • Use the below command to suspend the replication task.
    • Suspend-MailboxDatabaseCopy – Identify “DB1\servername’\
    • Now, remove the existing data file with the below command.
    • Update-MailboxDatabaseCopy – Identity “DB1\Servername” – DeleteExistingFiles
    • Wait for the command to execute. Once the cmdlet is executed, restart replication of the database. You can also perform manual replication with the below cmdlet.
    • Update-MailboxDatabaseCopy -Identity “DB1\servername” – DeleteExistingFiles – ManualResume

      After performing these steps, you will not face the stuck in queued error. However, if the problem still exists, then you can use the below methods.

  4. Using DataMoveReplicationConstraint

    This method is applicable to Exchange 2010/13/16 environment. You’ll have to set DataMoveReplicationConstraint value to none. Make sure you don’t set it to zero. You can follow the below steps to set the value to none.

    • First, you’ll have to check the value of constraint, whether it is Second copy or SecondDatacenter. The command will look like this:
    • Set-MailboxDatabase – Identity database name – DataMoveReplicationConstraint Second copy
      Set-MailboxDatabase – Identity databasename – DataMoveReplicationConstraint SecondDatacenter
    • If any of the above cmdlets are available, then replace it with the below command: None
    • Set-MailboxDatabase – Identity databasename – DataMoveReplicationConstraint None

      After replacing the command, try to migrate Exchange mailboxes again. The problem may not persist again.

Limitations of Manual Methods

Well, performing the above manual methods might resolve some issues, but there are some limitations with it, such as:

  • These methods are not ideal for every Exchange version
  • You cannot migrate mailboxes in bulk with these methods
  • Performing can also result in loss of mailboxes data, or it can disturb the hierarchy mailboxes.

So, to deal with these limitations, there is an alternate solution that doesn’t involve using the New-MailboxExportRequest for exporting Exchange mailboxes. You can directly export Exchange mailboxes to Outlook PST with the help of this tool.

Kernel Migrator for Exchange

It is one of the best tools designed with advanced algorithms to migrate Exchange mailboxes from both on-premises and hosted Exchange. It can migrate every item of Exchange, such as Mailbox items, rules/folder permissions, Outlook profiles, etc. without any data interruption. Also, the smart filters allow you to migrate specific data of Exchange based on item type, date, include/exclude folders, etc. With this Exchange migration tool, you can easily perform Exchange to Exchange migration.

Wrap Up

Migrating mailboxes from Exchange is crucial to keep the data safe. However, many users encounter the New-MailboxExportRequest error with the manual approach. So, here we have mentioned some effective solutions to get rid of this issue. Also, we have mentioned a third-party tool that enables users to migrate Exchange mailboxes quickly.

The post Fix Error Mailbox Export Request Stuck Queued appeared first on Kernel Data Recovery - Wide range of data recovery softwares.


from Kernel Data Recovery – Wide range of data recovery softwares http://bit.ly/2PkLi5U

Fixing “Outlook Cannot Synchronize Subscribed Folders” Error

Outlook is a widely used email application, and there is a reason for that. Users can easily configure many email accounts like IMAP, POP, Office 365, or Exchange with MS Outlook and access all their emails/messages at one place. But, having many folders and messages with attachments often makes Outlook slow, especially when you configure many IMAP accounts with Outlook.

Many users often receive an error “Outlook cannot synchronize subscribed folders” when connecting IMAP emails with Outlook, sometimes reporting an error 0x800CCC0E.

Reasons for This Error

This error occurs because Outlook downloads all the messages with attachments when you connect an IMAP email account with it. Also, with an IMAP email account, only headers are synchronized to represent crucial information, and the email’s attachments are only downloaded when you open/view a message, or you’ve set Outlook to download all messages.

When you receive this error, it means Outlook is not set up to recognize that the server requires an advanced IMAP configuration parameter to read from the folder structure properly. So, here we will talk about the methods that can be used to resolve this error.

Methods to Resolve this Issue

There are only a few methods available to resolve this error. Here we have highlighted the most effective solutions.

  1. Configuring IMAP Account Settings

    The first solution to fix this issue is by providing Outlook to recognize advanced configuration for the IMAP account. Follow the below steps to perform it.

    Note: This solution is only suitable if the server uses IMAP as its mail server that you’re connecting to.

    • Open MS Outlook and go to File > Info > Account Settings and click Account Settings.
    • Under the Emails tab, double-click the IMAP email account.
    • In the IMAP Account Settings dialogue box, under Folder settings, you’ll find the Root folder path option.
    • Set this field to INBOX and click Next to apply the settings.
    • Now, close MS Outlook completely and re-open it to see the changes.

    After performing these steps, you might not face this problem again. However, if you find that the mail folders have disappeared after making these changes, then revert the changes and restart outlook to get back your folders.

  2. Try Removing or Re-adding Email Account

    Another method to fix this problem is to remove and re-add the IMAP account to MS Outlook. To do this follow the below steps:

    • Open MS Outlook and go to the File tab.
    • Now, click Add Account to add a new email account to Outlook.
    • If you’re using MS Outlook 2016, then enter the email address and click Connect.
    • After entering the credentials, click Finish to configure your email account.

    You can also configure an IMAP email account to Outlook with advanced settings. After configuring the account again with Outlook, you’ll not face this issue again.

  3. Perform a Clean Boot in Windows

    If the problem still persists, then start your PC in Clean Boot to check if any other software is conflicting with Outlook.

    • Open your PC as an administrator and click Start.
    • Type msconfig in the opened wizard.
    • Now, search and select System Configuration in the opened wizard.
    • Go to Services tab and check the checkbox Hide all Microsoft Services, and then click Disable all.
    • Go to Startup tab and click Open Task Manager.
    • Now, select each item in the task manager separately and click Disable, and then close the Task Manager.
    • Restart your computer and install Outlook again.

This way you can start the PC in clean boot mode, and after fixing the issue, you can start the PC normally.

Alternate Solution – Kernel for OST Recovery

If you still face the same issue even after trying all the above methods, then there is a problem with the OST file. When you configure an IMAP account with Outlook, an OST file of the email is automatically created on your system. You’ll have to repair this OST file to fix the issue.
You can use Kernel for OST Recovery tool allow you to repair any Outlook OST file quickly. It is enriched with smart algorithms that can fix even the most challenging errors in an Outlook file.

Conclusion

MS Outlook is a great email application that allows you to use all your emails at one place, but the error Outlook cannot synchronize subscribed folders can create problems for users. So, it’s crucial to fix this problem. In this article, we have mentioned some of the most effective ways to fix this error. Hope, it will help you!

Download

The post Fixing “Outlook Cannot Synchronize Subscribed Folders” Error appeared first on Kernel Data Recovery - Wide range of data recovery softwares.


from Kernel Data Recovery – Wide range of data recovery softwares http://bit.ly/2GgN3hC

Learn How to Create a Public Folder in Exchange Server 2016 or 2010

Public Folder is a common space to share essential data with your team members. It is a popular feature in Exchange Server which helps the distribution of information in various teams and groups. The Exchange Administrator can decide who can access the Public Folder or can make it accessible to all.

Here are some mailbox items which the users can put in a Public Folder –

  • Email messages
  • Notes
  • Journals
  • Calendar entries
  • Customized templates
  • Contacts
  • Attributes

Due to the convenience which the business gets due to the public folders, you can find it playing a central role in streamlining the business processes. In the present writeup, we cover a detailed step-by-step procedure of creating a public folder using the Exchange Admin Center (EAC) and Exchange Management PowerShell cmdlets.

Create a public folder using the Exchange Admin Center

Before creating a public folder, you need to create a public folder mailbox. The public folder mailbox contains of the hierarchy information and content for the public folder. The first public folder mailbox is the primary mailbox which can save the writable data of public folder hierarchy. All the other public folder mailboxes are secondary public folder mailboxes which can have the read-only copy of hierarchy. Here is the whole process –

Step 1) Sign in to Exchange Admin Center using the Administrator credentials.

Step 2) Go to the public folder mailboxes tab under the public folders in the menu. Click the Add (+) button.

Step 3) Input the name of the new public folder mailbox. Browse the location to create the object. Also, browse the destination database for the public folder. Click the Save button.

Step 4) The first public folder mailbox shows its status as the ‘Primary Hierarchy’ and all the remaining mailbox shows its status as ‘Secondary Hierarchy.’

Step 5) Now go to the public folders tab and click the Add (+) button.

Step 6) Provide a new name to the public folder and also select its path. Click the Save button.

Step 7) After creating the public folder, refresh the list and see the new public folder there. You can click the ‘Enable’ option and enable the Mail settings for the public folder.

You can also Disable the Mail setting using the same method.

Create Public Folder using the Exchange Management Shell

The Exchange Management Shell follows the same procedure for creating a public folder – first creates the public folder mailbox, then creates the public folder, and enables/disables Mail settings. Here is the process –

Step 1) Create a public folder mailbox using the following cmdlet.

New-Mailbox -PublicFolder -Name “Web Public Folder”

It creates a ‘Primary Hierarchy’ mailbox. If you write the cmdlet again, then it creates a ‘secondary hierarchy’ mailbox.

Step 2) Run the command to verify the existence of a public folder mailbox.

Get-Mailbox -PublicFolder | Format-Table -Auto Name,ServerName,Database,IsRoolPublicFolderMailbox

Step 3) Create a public folder.

New-PublicFolder -Name WebReports -Path \Web\2019

Step 4) Check the status of the public folder.

Get-PublicFolder -Identity \Web\2019\WebReports | Format-List

Step 5) Mail-Enable the public folder.

Enable-MailPublicFolder -Identity “Web\2019\WebReports”

Step 6) Mail-Disable the public folder.

Disable-MailPublicFolder -Identity “Web\2019\WebReports”

Create Public Folder in Exchange Server 2010

If you are still using Exchange Server 2010, then you may need to follow a different path to create the public folder. Follow the upcoming steps –

  1. Start the Exchange Management Console.
  2. Go to Organization Configuration and choose Mailbox.
  3. Under the Database Management tab, go to database list, right-click it and select the option New Public Folder Database.
  4. Specify a new name to the public folder and browse the mailbox server.
  5. Click the Finish button, and there is a new public folder tree is present in the list.

Conclusion

So, this is the whole process which you can follow to create a ‘mail-enabled’ public folder and share the crucial information with the desired team members or groups. However, if the public folder data gets deleted or there are inaccessibility issues, then you have to face data lose if there is no recent backup of it. In such a case, trust the Kernel for Exchange Server recovery software which accesses the corrupt Exchange Database and fixes the corruption in the least time. It can also recover the public folder data in full health and bring it to you just like you had saved it.

Download

The post Learn How to Create a Public Folder in Exchange Server 2016 or 2010 appeared first on Kernel Data Recovery - Wide range of data recovery softwares.


from Kernel Data Recovery – Wide range of data recovery softwares http://bit.ly/2KpfmPe

Step-by-Step Guide for Exchange 2010 to 2019 Migration

If you are currently working with Exchange 2010 and are allured by the exclusive features in Exchange 2019, then the most important fact to know is that there is no direct method for migrating from Exchange 2010 to Exchange 2019 manually. Also, if you try the double-hop method for the migration, you may end up in chaos as the steps are a little bit technical and complex. The manual migration can be successful but at the cost of your precious time and effort.

A better option is to perform the migration with an automated solution that accomplishes migration without costing the data quality and integrity. Kernel Migrator for Exchange, an advanced migrator, facilitates all the ideal conditions for the safe migration. Users can perform Exchange Server migrations for all versions including Exchange 2019. Automated mapping, CSV file usage, filters and options for data selection, notifications, and reporting facilities are the best of Kernel Migrator for Exchange features. So, before proceeding to the migration procedure of Kernel Migrator for Exchange software, let us know the new features of Exchange 2019.

  • Allows adding non-English characters to email addresses with EAI proxy to accepted domains
  • Updates to the calendar feature with Do not forward, Out of Office and other management options
  • Option for installing Exchange on Windows Server Core is enabled again
  • Dynamic Database Cache for providing more cache memory for the active database
  • MetaCache Database for working smoothly with larger disks and SSD disks
  • Search Index for a mailbox is in the mailbox only rather than on the database.

Now, head on to the important section of this guide i.e., migration of Exchange 2010 to Exchange 2019 with Kernel Migrator for Exchange.

Migrate Exchange 2010 to Exchange 2019 with Kernel Migrator for Exchange

Kernel Migrator for Exchange software is the best software that allows migration between any two versions of Exchange Server. It performs hosted Exchange migration, migration between the same or different domains, etc. With this tool let us perform the migration from Exchange 2010 to Exchange 2019. First, download and install Kernel Migrator for Exchange from https://www.nucleustechnologies.com/exchange-migration/

  1. Run the migrator software by double-clicking the application icon. Click Add Project to add a project name for the migration.

    Run the software and add a project name

  2. Provide any name for the project and then click OK.

    Provide the project name

  3. The project will be created. Now, click Add Job for mailboxes to add a job for mailboxes migration.

    After adding project, click on Add Job for mailboxes

  4. Provide any name for the job and click OK.

    enter project name and job name

  5. Now, provide the source Exchange 2010 login details like the domain name or IP address, user name, password, and validate these credentials with Validate button. Use the existing profile and previous session mailboxes options (if required). Then, click Next.

    provide the source Exchange 2010 login details

  6. Choose the source mailboxes you need to migrate and click Next.

    Choose the source mailboxes

  7. Now, add the destination Exchange 2019 login details like the domain name or IP address, user name, password, again validate them. Select the given options, if required. Click Next

    add the destination Exchange 2019 login details

  8. Add the filter options like Message Classes, Date Filter, Folder Filters, etc. After that, click Next.

    Add the filter options

  9. Map the source mailboxes with the target mailboxes by any method- manually, automatically or using CSV file. Select the checkbox if you require and click Next.

    Map the source mailboxes with the target mailboxes

  10. After the mapping of mailboxes, the user will come across different options for managing the data like managing bad items and synchronization, configuring job and notification settings, scheduling time for migration, report console, etc. Set them as required and click Next.
  11. Then Notification Summary with all details of migration is displayed. Confirm and then click Finish.

    displayed migration details

  12. Now the migration gets started and completed based on the amount of data to be migrated. In the end, you will receive migration status as Success.

    There you understood all the necessary steps for migrating from Exchange 2010 to Exchange 2019. The migrator solution is the best one that you can rely upon for all type of Exchange migrations.

Conclusion

With every new update in Exchange Server, a need for migration from the previous version arises. For migration from Exchange 2010 to 2019, a professional solution is recommended as there is no direct method for it. The complete discussion of this migration with the best migrator software, Kernel Migrator for Exchange is done here for users. Hope it helped!

The post Step-by-Step Guide for Exchange 2010 to 2019 Migration appeared first on Kernel Data Recovery - Wide range of data recovery softwares.


from Kernel Data Recovery – Wide range of data recovery softwares http://bit.ly/2uH3wVT

Fixed – “Could Not Complete the Operation. One or More Parameter Values are Not Valid”

Being an executive, I use Outlook extensively for sending/receiving emails. Outlook has always been a fantastic email client for me, but last night while sending an email, I received an error “Could not complete the operation. One or more parameter values are not valid.

After researching a lot, I got to know that many users face this error while sending an email, assigning a task, or saving a new contact. And the main reason behind this error is the corruption in the Auto-Complete list. So, I tried to figure out some solutions to fix this error.

In this article, I have mentioned the effective methods to fix “Could not complete the operation. One or more parameter values are not valid” error in MS Outlook.

Methods to Fix this Error

One of the best and most effective solutions to fix this error is clearing the Auto-Complete list. Now, there are different ways to clear the Auto-complete list in the latest Outlook versions. Here, I have covered the basic and most effective methods.

  1. Common Solution – Clear One by One

    This method is common for all Outlook versions. In this method, you’ll have to remove each email address one by one from the Auto-complete list. To use this technique, type the first letter of the name in the address bar when creating a new email. The name of the recipient will automatically appear in the address bar, move the mouse cruiser over it and delete it.

  2. Empty the Entire Auto-Complete List

    Another way to clear Auto-complete list is to empty the entire auto-complete list in MS Outlook. Follow the below steps to empty the Auto-complete list:

    • Open MS Outlook and go to the File tab and click Options.
    • In the opened wizard, select Mail and scroll to Send Messages section. Click the Empty Auto-Complete icon.
    • A notification will appear on the screen confirming the same. Click Yes to empty the list.

This way you can quickly empty the auto-complete list. After performing this technique, try to send email from your Outlook account. You will not face that error again. However, if you still encounter the same error, then you’ll have to clear the cache of the autocomplete list.

To clear cache of the auto-complete list, open the Run command and type the following command.

After clearing the cache, you’ll not face this issue again. However, if you’re still facing the same error again and again, then there might be a problem with the PST file of MS Outlook. In such scenarios, repairing the PST file is the only solution to deal with this problem. Though there are manual techniques to repair PST file, none of them are reliable.

Kernel for Outlook PST Recovery

Kernel for Outlook PST Recovery software allows users to repair and recover data from corrupt PST files. It allows you to repair even large-sized PST files that are often not compatible with other tools. Also, you can retrieve permanently deleted messages and attachments with the help of this tool. You can even export the PST file to Office 365, email servers, and Web email clients with the help of this software.

Conclusion

“Could not complete the operation. One or more parameter values are not valid,” error becomes a huge obstacle when you have to send an urgent email from Outlook. So, dealing with this error is crucial in every situation. Keeping this in mind, I have mentioned the best practical solutions to fix this error.

Download

The post Fixed – “Could Not Complete the Operation. One or More Parameter Values are Not Valid” appeared first on Kernel Data Recovery - Wide range of data recovery softwares.


from Kernel Data Recovery – Wide range of data recovery softwares http://bit.ly/2Yox73U

Resolve the error – ‘Exchange database content index state failed.’

The topic of discussion in this article is one of the Exchange Server errors “Content Index state failed’. Basically, we will be going to learn how to get rid of this unwanted Exchange Server error (for versions above Exchange Server 2010)

Exchange Server administrators and users encounter a variety of errors while working on it. These errors create issues in the accessibility of email data. Likewise, when the Exchange users get struck with Content Index State Failed error, it:

  • Stops or interrupts the search process in the Outlook Web Access and Outlook applications
  • Blocks the activation of the passive database copies while switching over the database

You can check the content index state in your Exchange Server by running this command in Exchange Management Shell.


Get-MailboxDatabase Database Name | Get-MailboxDatabaseCopyStatus | Select Name,*index*

You will get the output results like your content index status is failed and suspended. You can get it for more than one content Index states.

Exchange administrators can take help of the Exchange Management Shell for making content index state in the healthy state again.

We are going to run the commands in the Exchange Management Shell for fixing the ‘content index state failed’ error.

Case1: When Exchange Server is a member of the Database Availability Group

Follow the below-given instructions carefully to repair the content index error:

  1. First to know which content indexes are affected and shows the failed status. Then run this command in Exchange Management Shell:


    Get-MailboxDatabase Database Name | Get-MailboxDatabaseCopyStatus | Select Name,*index*

  2. Repair the catalog of the affected database by executing this command:


    Update-MailboxDatabasecopy Database\Server1 –sourceserver Server Name –catalogonly

    Here, use Database Name in the format Database\Server and source server name is the one in a healthy state.

    The time for the completion of this update is dependent on its size. Repeat this procedure for all damaged database copies.

  3. To check if the procedure has worked successfully, execute this command and see if the status has been changed to Healthy.


    Get-MailboxDatabase Database Name | Get-MailboxDatabaseCopyStatus | Select Name,*index*

    If the status of the content index state of all databases status is changed to healthy, then the error is fixed.

Case2: When Exchange Server is not a member of the Database Availability Group

Here, we have only one database copy with corrupt content index state ( as Exchange Server is not a member of DAG).

  1. First step includes stopping two Exchange services ( Microsoft Exchange Search and Microsoft Exchange Search Host Controller) either from the interface or by running these commands in Exchange Management Shell.
    • Stop-Service MSExchangeFastSearch
    • Stop-Service HostControllerService
  2. Navigate to the database saving location on your Exchange system. Here, search for the folder with a long string (GUID). This folder contains the content index of your database.
  3. Delete this folder with the long string along with all the sub-folders.
  4. Now start those Exchange services again which were stopped earlier. Run these commands:
    • Start-Service MSExchangeFastSearch
    • Start-Service HostControllerService
  5. Within a couple of minutes, a new folder with rebuilt content index gets created.

This solves the ‘corrupted content index’ issue in Exchange Server database.

However, even after performing these complex steps, if no success is obtained in the smooth access and search of data, then certainly your EDB file may be corrupted. You can try Kernel for Exchange Server Recovery tool that easily recovers all the corrupted and deleted data, and saves to destinations like Exchange Server, Outlook PST, Office 365 and Outlook profiles.

Download

Conclusion

Manual tricks to fix the Exchange error Content Index state failed for Exchange databases are explained here. In addition, a tool is recommended for safe EDB recovery in case of database corruption issues.

The post Resolve the error – ‘Exchange database content index state failed.’ appeared first on Kernel Data Recovery - Wide range of data recovery softwares.


from Kernel Data Recovery – Wide range of data recovery softwares http://bit.ly/2TD2eFh

What to do When Exchange Server 2010 Database Gets Dismounted?

Maintaining Exchange Server in full health is a challenge to Exchange administrators as a variety of hardware and software threats create hurdle every time. Whenever there is a dirty-shutdown situation, the transaction log file is either deleted or becomes corrupt. That’s why the database fails to mount, and administrators cannot mount it back with any manual technique.

The error which you will see when you fail to mount the database is following –

Error: Exchange is unable to mount the database that you specified. Specified database: ServerName\First Storage Group\Exchange Database; Error Code: MapiExceptionCallFailed: Unable to mount database. (hr=0x80004005, ec=-528).

The manual approach of mounting the database back to Exchange involves repairing it with the help of the ESEUTIL tool. It is an inbuilt tool of Exchange which runs on a command line environment and uses various switches to perform different operations. ESEUTIL tool

You can see ESEUTIL at its default location

C:\Program Files\Microsoft\Exchange Server\V15\Bin

The ESEUTIL switches check the health of the database and modify or repair it as per the need. Here is its list –

  • /D – It defragments the database and reduces the size of the database by removing the space. It also rebuilds the index.
  • /P – It performs the soft recovery of the database but skips the part of the database it cannot repair.
  • /C – It runs a hard recovery of the database.
  • /R – It is an essential switch as it restores the database by replaying the transaction log files bringing the database to a consistent state.
  • /G – It checks database integrity at page and ESE level.
  • /M – It accesses the information related to the log files and presents headers of the database file, transaction file, and checkpoint file.
  • /K – It checks and verifies the checksum of database and transaction log files.
  • /Y – It copies the large database file and manages them efficiently.

Now, you can go for the recovery by following the below steps –

  1. Check the consistency of the database.
    Eseutil /mh ‘ExchangeDatabase.edb’

    The command will return the information about the database, and if the state option shows dirty shutdown, then you need to run the repair command.

  2. Run the soft repair
    Eseutil/r ‘ExchangeDatabase.edb’

    The soft repair will work fine till only the log files are missing, but if the corruption is severe, then it will not work fine, and you have to go for the hard recovery.

  3. Run the hard repair
    Eseutil /p ‘ExchangeDatabase.edb’

    The hard repair will remove the corrupt data items from the database and allows only the healthy item to stay. But, Exchange experts advise not to go for a hard recovery option because you will lose the precious data.
    After running the hard recovery, rerun the first command and check the status of the database. If it shows the clean shutdown status, then mount the database back to the Exchange.

    Mount-MailboxDatabase -Identity ‘DatabaseName’

Limitations of ESEUTIL tool

  • ESEUTIL deletes the corrupt data; it can delete some data important to your business also.
  • You need to make much space to run the ESEUTIL tool as it defragments the database and if the size of the database is large, then it will create further issues.
  • You need to run ESEUTIL tool multiple times and then use the ISINTEG tool.
  • As you need to run the ESEUTIL tool multiple times, so the recovery procedure takes much time.
  • Only a seasoned Exchange administrator can efficiently use the ESEUTIL tool and recover the data completely.

If you do not want to face any threat to your data while recovering it, then you can use Kernel for Exchange Server Recovery software. It can access the dismounted database and recover the data to a production Exchange Server.

Kernel for Exchange Server

Kernel for Exchange Server is a recovery software which is specially designed for Microsoft Exchange Server. It allows to recover corrupt and deleted folder in Exchange 2010. The Exchange server recovery tool supports each version including the latest Exchange Server 2019. It does not require log files to recover the corrupt databases. And after recovery, you can directly save the data to a live Exchange.

Download

The post What to do When Exchange Server 2010 Database Gets Dismounted? appeared first on Kernel Data Recovery - Wide range of data recovery softwares.


from Kernel Data Recovery – Wide range of data recovery softwares http://bit.ly/2Yxftee

Exchange Server 2016 services not starting automatically? Get a solution here

If your Exchange Server 2016 services are not getting started automatically after you have performed a reboot, try this

Many Exchange experts suggest rebooting of Microsoft Exchange Server as a quick fix under the circumstances like unable to send/receive messages by users, directory service issues, CPU performance issues, etc. Rebooting may solve these problems. In fact, it is recommended to reboot the Exchange Server twice in a month for better functioning of Exchange Server.

But, once you have rebooted the Exchange Server and finds that all Exchange Services did not get started automatically, then there is a problem. The services which generally refused to get start automatically (shows Stopped as the status) after rebooting are:

 rebooted the Exchange Server

One can try the below-given method to manually restart the Exchange Services which did not get started automatically after the reboot.

Restarting the Exchange services manually

To restart the Exchange services manually, you must access the system on which the Exchange Server 2016 is installed. Then follow the given steps:

  1. Press Windows+R, type services.msc and click OK.

    Run services.msc

  2. In the opened Services page, select a Microsoft Exchange Service which shows Stopped as the status, right-click on it and then click Restart option from the menu.

    Microsoft Exchange Service

This will take some time for starting each Microsoft Exchange Service, but the problem can be resolved by performing this.

What if the Exchange database is not accessible?

You can try the above method to restart the Exchange services, but it might happen that users are still not able to access the Exchange mailboxes to send or receive emails. This condition gives a strong sign of corruption in the Exchange database. There are manual solutions like the in-built Eseutil application for fixing the corruption in EDB file, but all are time-taking, unreliable, unsafe and lengthy in nature.

For smooth and safe recovery of the corrupted Exchange database file, we recommend you try the best Exchange Server recovery software in the market, Kernel for Exchange Server. It can automatically recover and restore mailboxes database in Exchange. Some important attributes of advanced Kernel for Exchange Server tool are:

  • Recovery of all sort of EDB data including mailboxes and public folders
  • Compatible with all Exchange Server versions (including 2016 & 2019)
  • Includes advanced filters and options for mailbox item selection
  • Various saving destinations like Outlook, Office 365, live Exchange, Outlook profiles, etc.
  • Easy drag/drop, copy paste, export options to move data between the source & destination
  • Demo version for a free trial (with some saving limitations)

Hence, with so much amenities this advanced software still incorporates simple and interactive Graphic User Interface for the users’ convenience.

Download

Summary

Users got to learn the primary method to follow if, after rebooting, some Exchange Services did not start automatically. But in severe EDB corruption conditions, a trusted professional tool is the best choice.

The post Exchange Server 2016 services not starting automatically? Get a solution here appeared first on Kernel Data Recovery - Wide range of data recovery softwares.


from Kernel Data Recovery – Wide range of data recovery softwares http://bit.ly/2UaLt8J

How to Reset the Password of an Outlook PST File?

To ensure limited access and data privacy, Microsoft Outlook allows you to secure your PST data file with a password.

Inside

You can also set a password even if you are not transferring the PST data file to a different machine or exporting the data into the PST file for someone else.

set a Outlook password

Securing the PST file with a password is quite easy, the built-in option helps you in doing so, but while setting a password, it is imperative to create a strong password.

A strong password is a good combination of multiple characters which makes it hard even for guessing. And what if a person forgets his/her password? It’ll be impossible to access the password secured PST data file if you don’t remember it.

Thus, in this article, we’ll guide you on how to reset the password of an Outlook PST data file with ease and make the file accessible again. Before we jump straight on password resetting part, we’d suggest you some tips on How to create a strong password which is hard enough to crack but easy enough to remember.

create a strong password

Pro Tips to Create a Safe, Memorable, Strong Password

Make sure the password you choose should be a combination of alphabets, numbers, special characters, but that’s not the whole tip, check the points below:

  • Alphabets: Always use one or more upper case and lower alphabets in your password.
  • Number: Try to think of a combination of numbers like the date-of-birth year or current year.
  • Note: You can also try choosing a specific number combination in reverse.

  • Special Character: When selecting a special character, Asterisk (*) and Hashtag (#) are the famous ones, you can also choose from one of these or a different one. Pro tip on selecting a special character is to put it at first of password string.

With all these tips implemented, you can create a strong and secure password which you can remember easily, for example, #Password2019.

Now let’s jump on to how to reset the password of an Outlook PST Data file in case if you don’t remember. Like it is mentioned above.

With Microsoft Outlook, you can reset the PST data file password and replace it with a new one only if you know the old password, but cases similar as above, the only option rests, is using third-party software.

Advanced Outlook Password Recovery Tool

Kernel for Outlook Password Recovery tool is one of the best third-party Outlook PST password recovery tools you can look for on the web. It allows you to recover, remove, and set new – reset, password with a few clicks, as shown below. You can deal with all password related jobs either of single or multiple Outlook PST file(s) in a single go.

Free Download

Outlook Password Recovery tool

The process of password recovery or removal or resetting, is simple and straight; follow the steps given below to reset the password of an Outlook PST data file:

  1. Launch Kernel Outlook Password Recovery.
  2. Click on Add Files to a password secured PST data file and click Set New Password.

    Add Files to a password secured PST data file
    Note:To select multiple Outlook PST data file(s), click on the Add Files button again and then proceed to the next.

  3. Make sure to create a backup file before proceeding any further. Click I have the backup, continue.

    create a backup file before proceeding

  4. Provide a new password, and enter it again to confirm the new password. Click Ok.

    Set new password
    Note:To create a safe, easily memorable, and strong password, look in the section above.

  5. Click Ok.

    Process completed - save the report to CSV
    You’ve successfully reset the password of an Outlook PST data file –a locked PST file.

Conclusion

Kernel for Outlook Password Recovery tool comes with simplicity and ease; thus, it enables you to perform multiple Outlook PST password related tasks faster and easier.

Free Download

The post How to Reset the Password of an Outlook PST File? appeared first on Kernel Data Recovery - Wide range of data recovery softwares.


from Kernel Data Recovery – Wide range of data recovery softwares http://bit.ly/2FgYTYN